Spring 源码剖析 - ApplicationContext
Spring源码剖析 - ApplicationContext
前言
实话说,Spring虽火,但我的使用经验却不多。这和我的实际工作经历有一定关系,前几年初入软件这行,项目使用Struts1,第一次使用Spring,还是在同时期的外快项目,非常表面。换公司后直接转向Vertx技术栈,近一年多虽然又转向Spring,但手上的Spring项目并不复杂,也没抽时间好好过一遍Spring。于是,Spring成了心病,你可以说它千万好坏,但首先得掌握它,这一点我做的不好,所以是时候研究一下它。
Spring说简单也简单,本质上就一个依赖注入、面向切面的框架;Spring MVC也只是针对Web应用场景的抽象,会定义Controller、Servier、Repository就会用;Spring Boot就是一个快捷启动方式。说复杂也复杂,Spring太大了,人们常说Spring上手容易,精通难,没错,但有点废话,我印象中没有几门技术精通起来是容易的。
Spring的大,一是体现在功能的全面,同一件事提供多种处理方式,对老手是利器,对新手就抓瞎;二是体现在源码上,Spring的源码很大,抽象层次很多:比如BeanFactory有ConfiurableBeanFactory、HierarchicalBeanFactory等抽象,ApplicationContext也有很多。基础知识涉及也较多:如果要了解Spring Web的工作配置原理,首先要了解Servlet规范;要了解AOP,首先要了解JDK动态代理、CGLib的区别,最好还了解一下ASM,因为Spring读取Bean时也有用到;要了解资源国际化,你首先要了解JDK提供的ResourceBundle;三也体现在手册上,Spring的手册写得很好,但是很长,有尝试过通过读手册来学习Spring,但手册大而全,没有重点,不会讲原理,用的时候翻翻还行,深入探究就不管用了。
方式方法
先整体,再局部。明白DI的原理,先要了解Spring是如何运行起来的,我相信很多人在CRUD太久之后,甚至连Spring是如何跑起来的都忘了。
我们主要探究Spring容器的运行方式、主要组件;Spring Web的运行方式;Spring Boot的运行方式。其余部分,无非是基于Spring的基本机制,实现了某项成熟的技术或规范(比如Spring Web),可以分阶段研究。
目前来说,大致可以分为这么几个部分,本文是第一部分
ApplicationContext拆解- 如何管理Bean、DI
- AOP怎么做的
- SpringBoot是怎么Boot的、AutoConfigure如何实现的
总览
一个基本的Spring应用,可以这么写
1 | package com.gitee.floyd.springme.core |
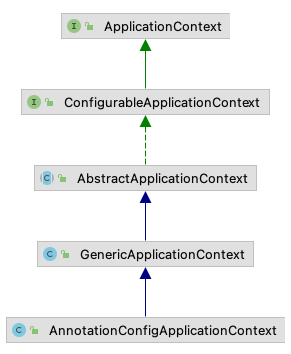
很显然,这里的关键是AnnotationConfigApplicationContext,大家都知道,这是基于注解进行配置的上下文,对应的还有ClasspathXmlConfigApplicationContext,但它已经过时了,不在我们的讨论范围。
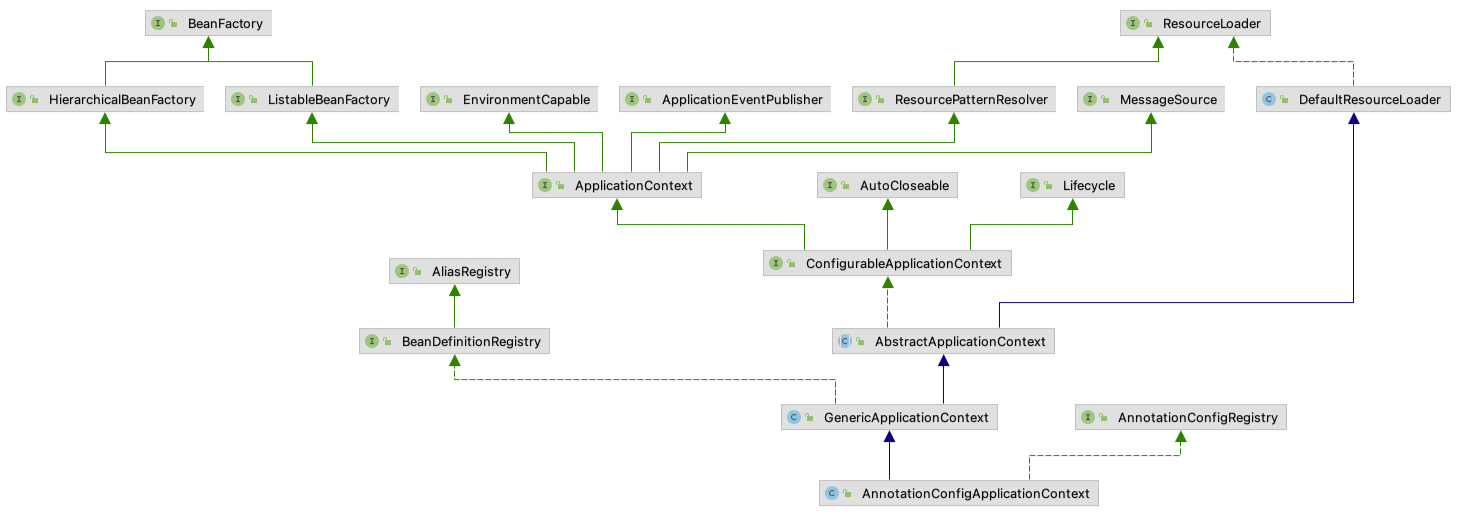
如上是该类的主要继承图,包含了Spring的大部分组件,我们都看一遍
BeanFactory:Bean工厂,容器的核心Environment:环境,包括环境变量,各种配置资源ApplicationEvent:容器内事件机制ResourceLoader:资源加载MessageSource:消息加载,可用于资源国际化LifeCycle:生命周期管理机制AnnotationConfigRegistry、BeanDefinitionRegistry:几个注册器- 各层次的
ApplicationContext:容器的实现逻辑
关键组件
BeanFactory
首先看BeanFactory本身,其能力很简单,就是Bean的管理,主要包括如下。注意它并不包含Bean的创建哦。
- 根据name、类名等获取Bean
- 判断Bean是否存在、是否单例、是否原型、别名
- 获取Bean的类型

BeanFactory总共有五个直接或间接的子类
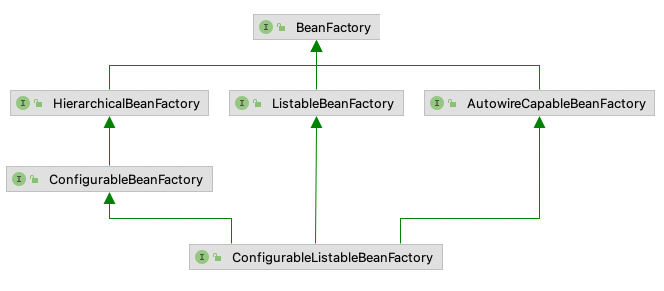
HierechicalBeanFactory让
BeanFactory变得有继承关系,它让容器也变得有层级关系,其创建Bean的关系类似类加载器,这样做的好处是每一层的容器只需要关注自己的Bean管理1
2
3
4
5
6public interface HierarchicalBeanFactory extends BeanFactory {
// 获取父工厂
BeanFactory getParentBeanFactory();
// 判断当前工厂是否包含指定name的Bean
boolean containsLocalBean(String name);
}ListableBeanFactory让
BeanFactory拥有List的能力,增加了批量获取Bean的能力,与BeanFactory相比,还多了根据注解获取Bean的能力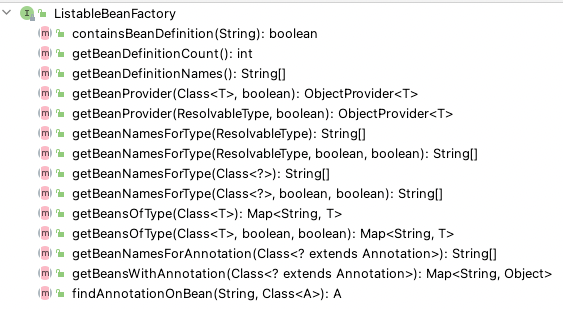
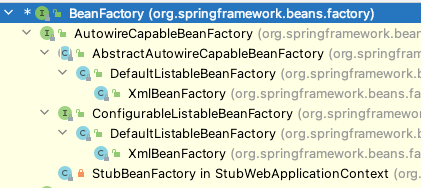
AutowireCapableBeanFactory具有自动注入能力的
BeanFactory,让BeanFactory有创建Bean、初始化Bean、注入Bean、配置Bean、对Bean应用PostProcessor、销毁Bean的能力,换言之,拥有了管理Bean的生命周期的能力。不过需要注意的是,这个接口对于目前基于注解的容器来说,已经没有使用了,去看他的继承关系就知道,那还是远古时期的XmlBeanFactory有用,所以了解一下就好。
ConfigurableBeanFactory提供了各种配置方法,配置的项目都是
BeanFactory在容器管理生命周期中所需的,具体来说,包括Bean的ClassLoader,用于加载Bean- 设置是否存储元信息
- 设置
BeanExpressionResolver - 设置
ConversionService - 添加
PropertyEditorRegistrar - 注册对某个类型的
PropertyEditor - 设置
TypeConverter - 添加
StringValueResolver,用于解析内嵌的字符串值 resolveEmbeddedValue,用上面的解析器解析内嵌的值- 添加
BeanPostProcessor - 注册
Scope - 设置
ApplicationStartup - 获取
AccessControlContext - 获取合并后的
BeanDefinition - 注册Bean之间的依赖关系
- 销毁Bean
- 销毁所有单例
上面一些组件可以留待以后详细探究。
ConfigurableListableBeanFactory他就是为ListableBeanFactory提供各种配置方法

小结:BeanFactory及其各种派生接口,都是围绕Bean创建、维护、容器组件注入所展开,依据能力进行了拆分。
Environment
一个完整的Environment派生关系如下,从上面BeanFactory个子接口命名规则我们大概可以猜出
PropertyResolver:属性解析器,提供基础的键值对获取能力Environment:Spring环境的抽象,对应profile,如生产、测试、QA环境ConfigurableEnvironment:提供配置设置和获取能力,这其中最为重要的是getPropertySources()方法,MutablePropertySources作为返回值,这意味着它维护的是多个配置源,比如- 系统属性
- 系统变量
application.properties设置的变量等
AbstractEnvironment:环境的基本实现StandardEnvironment:环境的标准实现- 其它三个Web相关的
Environment:将Servlet中相关的属性也加入Environment中
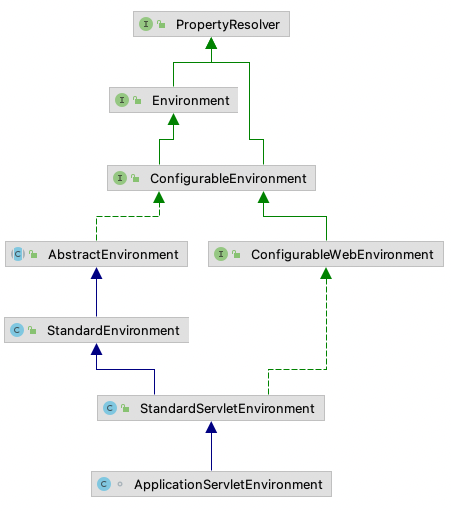
既然Environment就这么几个类,我们完全可以看看它的工作原理:假设创建了一个ApplicationServletEnvironment实例,我们看看它本身的初始化过程和获取一个环境变量所需的步骤。
初始化
按照构造方法依次追踪下去
- 创建
MutablePropertySources并赋予propertySources属性,以便永久持有 StandardServletEnvironment的配置- 向
propertySources中添加servletConfigInitParams、servletContextInitParams、jndiProperties三个属性源
- 向
StandardEnvironment的配置- 向
propertySources中添加systemProperties、systemEnvironment两个属性源
- 向
- 完毕
获取变量
关键逻辑在org.springframework.core.env.PropertySourcesPropertyResolver#getProperty(java.lang.String, java.lang.Class<T>, boolean)中
从propertySources中按顺序迭代,找到第一个匹配的key,取出
- 解析取出值的占位符,占位符对应的值只可能从系统属性、系统环境变量、ServletContext的InitParam中获取,并不能随处获取
- 如果获取的目标并非字符串,则会使用
ConversionService进行转换,这个ConversionService可以自己设置,否则使用默认的DefaultConversionService
小结
可以看一下最开始的例子中Environment是什么样子,可见,它只是一个StandardEnvironment,于是只有系统属性和系统环境两个配置源。
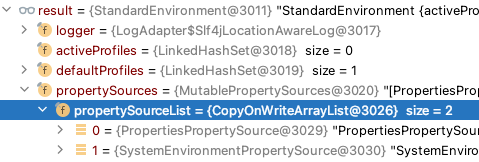
小结:当然,任何Environment的调用者都能够往里塞环境变量源,这里并不能看到全貌,还需要具体应用具体分析。
ApplicationEvent
Spring的事件机制比较简单,只是涉及到几个关键的类
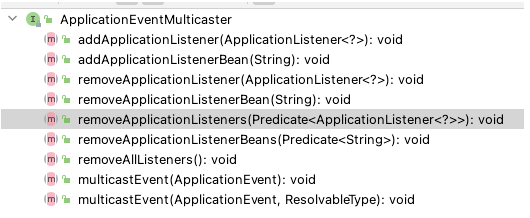
ApplicationEventApplicationEvnetPublisherApplicationEventMulticaster
ApplicationEventMulticaster是关键。它被AbstractApplicationContext持有,并在AbstractApplicationContext中完成消息的发送。它的组成也比较简单,就是监听器和事件的粘合剂:持有批量监听器,发送消息调用multicastEvent()。
广播消息的逻辑如下。可见,消息的发送,不一定是异步的,也可能是同步的,取决于是否提供了线程池。
1 | public void multicastEvent(final ApplicationEvent event, @Nullable ResolvableType eventType) { |
ResourceLoader
资源加载器。
Resource
首先,什么是资源Resource:一切资源的抽象定义,一个资源有这些特征
- 可开启
- 可判断是否存在
- 可获取内容长度
- 可获取读取它的Channel
- 具体的资源由他扩展而来
我们可以看一下Spring中定义了多少种资源。

一个最典型的Resource就是文件,当它是文件时,一切都很好办了;另一个典型的Resource是网络数据,比如MultipartFileResource,通过输入流读取它就行了;也可能仅仅是一个路径构成的资源,比如PathResource。
ResourceLoader
资源加载器,Spring中主要实现如下
ResourceLoader是最抽象的接口,只定义了根据位置获取资源的方法1
Resource getResource(String location);
ResourcePatternResolver更进一步,定义了根据匹配规则返回一批资源的方法1
Resource[] getResources(String locationPattern) throws IOException;
DefaultResourceLoader定义了加载器的基本实现,它的派生类只是具体小众应用场景的扩展,内容很少,这里可以忽略重点关注
getResource(String location)的实现逻辑- 如果待解析的location以
/开头,则解析成ClassPathContextResource。 - 如果以
classpath:开头,则解析成ClassPathResource - 否则以URL来解析这个字符串,最终被解析成
FileUrlResource或UrlResource
- 如果待解析的location以
PathMatchingResourcePatternResolver,这是ResourcePatternResolver的唯一实现,默认采用Ant风格的匹配规则对资源路径进行匹配。重点关注
Resource[] getResources(String locationPattern)的实现逻辑- 如果以
classpath*:开头,- 如果路径部分是通配符,则查找通配符匹配的资源
- 否则,在所有的包路径下查找精确匹配的资源
- 否则
- 如果路径部分是通配符,则查找通配符匹配的资源
- 否则,退化为
DefaultResourceLoader.getResource()
- 如果以
那些前缀
classpath:在当前包的类路径下查找classpath*:在整个项目包含的包的类路径下查找file:在文件系统中查找jar:在jar文件中查找war:在war文件中查找
这些前缀,可别用惯了就忘记了,它们只属于Spring,JDK是不认识的。
小结
资源加载,最底层很多时候用的都是ClassLoader去实现,因此,对ClassLoader的了解还是很重要的。
MessageSource
资源国际化
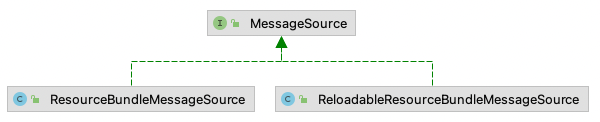
消息资源,这是用来做资源国际化的,你看接口定义就知道了:获取消息
1 | public interface MessageSource { |
这里重点理它的参数,举个例子,我们定义两个文件
1 | # message.properties文件中 |
- code:就是在配置文件中设置的key,对应上面的hello
- args:文本中需要填充的参数,对应上面的name
- locale:目标地区,对应上面的zh_CN
ResourceBundle
上面我们看到,Spring提供的主要实现就是ResourceBundleMessageSource,因此理解ResourceBundle是关键。
ResourceBundle,直译为资源包。它包含了一系列与Locale相关的资源包,可根据当前Locale获取不同的内容。JDK官方有两个子类:PropertyResourceBundle和ListResourceBundle,前者使用List的形式提供数据,后者使用properties文件的形式提供,当然我们也可以提供我们自己的。它的使用方法,必须有一个baseName,比如message,具体的Locale要有具体的后缀,比如message_zh_CN。如果是PropertyResourceBundle,对应的就是message.properties和message_zh_CN.properties。
那么,它是怎么工作的呢?我们从ResourceBundle.getBundle看起,通过一系列跟踪,可以来到:java.util.ResourceBundle.Control#newBundle,发现它的逻辑大致如下
- 根据baseName和locale构建BundleName
- 如果待加载的资源格式是
java.class,则直接用反射获取类名为BundleName的资源类,并构建对象 - 如果待加载的资源格式是
java.properties,则用类加载器加载类路劲下的BundleName.properties - 默认情况下,这两种资源格式都被包含,也就是说,如果同时拥有一个实现了
ResourceBundle的BundleName类和BundleName.properties,前者会被优先探测到。
剩下的逻辑就很好理解了,ResourceBundle实现类维护键值对缓存,提供对应locale的值的查询。
再来看ResourceBundleMessageSource,忽略掉各种花里胡哨的抽象类、接口之类的,直接看这个类
loadBundle方法展示了它直接使用了PropertyResourceBundle这个类MessageSourceControl展示了它在读取properties文件时多加了一点配置:编码方式
小结
Spring为我们提供了资源国际化的抽象,底层使用了JDK的ResourceBundle实现。
LifeCycle
生命周期抽象。可以是Bean去实现它,也可以是ApplicationContext去实现它,它依赖的是容器在启动和关闭时发送相应信号,相关处理器回调对应的生命周期方法;对应的有SmartLifeCycle,它在ApplicationContext刷新时会自动调用start()方法。
生命周期管理的逻辑,在DefaultLifecycleProcessor中,我们来瞅瞅。重点关注三个方法
onStart()- 从
BeanFactory中获取所有类型为LifeCycle的Bean - 将所有
Bean按照phase值分组 - 按照分组
phase从小到大调用bean的start()方法,分组内启动顺序,按bean名称的排序来
- 从
onRefresh()- 和
start()一样,唯一的差别是,只处理实现了SmartLifecycle接口且SmartLifecycle.isAutoStartup()为true的接口。
- 和
onClose()- 从
BeanFactory中获取所有类型为LifeCycle的Bean - 将所有
Bean按照phase值分组 - 按照相反顺序调用
stop()方法,分组内启动顺序,按bean名称的反序来
- 从
那么,谁去启动DefaultLifecycleProcessor的呢?答案是AbstractApplicationContext,它在初始化时候创建了DefaultLifecycleProcessor,调用了onRefresh()方法,关闭时调用了onClose()方法。
小结:LifeCycle的工作原理还算简单。
AnnotationConfigRegistry
注解配置注册器,负责注册配置Bean,与众不同的是,它还提供了scan方法,扫描包名下的所有被注解配置的Bean。如果要了解扫描逻辑,去看它的方法实现。但这不是本文的重点,本文重点在于总览。
1 | public interface AnnotationConfigRegistry { |
BeanDefinitionRegistry

别名注册器和Bean定义注册器,顾名思义,这里不赘述。
ApplicationContext
对ApplicationContext接口,它本身并没有什么实质性的方法,只是对各种能力的集合。从接口继承上看,所谓ApplicationContext,就是拥有如下六种能力的上下文
- 具有管理、批量管理、按层级关系管理Bean的能力
- 具有资源国际化的能力
- 具有资源解析器的能力,而且还是通配符匹配的资源解析器
- 具有事件发送的能力
- 具有管理
Environment的能力

再看它们的派生类
ConfigurableApplicationContext提供将相应组件注入的能力,包括
- 应用ID
- 父上下文
Environment实例ApplicationStartup- 添加
BeanFactoryPostProcessor - 添加
ApplicationListener - 设置
ClassLoader - 注册关闭钩子等
AbstractApplicationContext这里实现了上下文的主要逻辑,即实现了所有接口的方法,把接口的能力兑现。它采用模板方法模式,定义了几乎所有逻辑,将最为关键的三个方法留给子类去执行:提供
BeanFactory。1
2
3protected abstract void refreshBeanFactory() throws BeansException, IllegalStateException;
protected abstract void closeBeanFactory();
public abstract ConfigurableListableBeanFactory getBeanFactory() throws IllegalStateException;从这里还可以看出一点,
AbstractApplicationContext几乎全都使用了代理模式,实现了相应的接口,但实际执行对应方法的实例都是注入进来的,而不是自己实现。这是很大的优点:将具体逻辑的实现交给具体的组件组做,ApplicationContext要做的就是将他们组织起来,并完成ApplicationContext独有的逻辑,对外提供的服务。它做了什么,下文”启动流程“将进行拆解。GenericApplicationContext这是一个通用的
ApplicationContext,直接能用,它提供了AbstractApplicationContext唯一缺少的BeanFactory,可传入,否则直接使用DefaultListableBeanFactory1
2
3public GenericApplicationContext() {
this.beanFactory = new DefaultListableBeanFactory();
}GenericApplicationContext不止实现了AbstractApplicationContext,还实现了BeanDefinitionRegistry,使得能够向beanFactory直接注入BeanDefinition。也就是说,要让beanFactory被注入Bean,有两种方法- 直接传入已经准备好的
BeanFactory - 调用
BeanDefinitionRegistry定义的注册方法,动态向其中注入Bean
- 直接传入已经准备好的
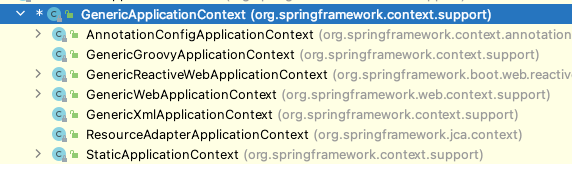
AnnotationConfigApplicationContext这里就用了第二种方法,`BeanFactory`直接使用默认的`DefaultListableBeanFactory`,然后使用`AnnotatedBeanDefinitionReader`和`ClassPathBeanDefinitionScanner`向其中注入Bean定义。**关于注解扫描Bean的原理,后面单独起一篇文章描述,本文跳过**。 还有更多具体的上下文实现,都是通过这种方式,不信你看
未提及,但重要
如下组件,虽然并不是ApplicationContext继承树中的直接部分,但会成为理解的绊脚石,这里将其踢开。
PropertyEditor相关
registrar是登记员;registry是登记簿。
PropertyEditor首先要理解什么是
PropertyEditor,它是JDK中的定义,它一般的用途,是用来支持GUI组件的属性修改,但也可以只实现两个方法,用来做类型转换Simple PropertyEditors may only support the getAsText and setAsText methods and need not support (say) paintValue or getCustomEditor. More complex types may be unable to support getAsText and setAsText but will instead support paintValue and getCustomEditor.
我们重点关注它的四个方法:
1
2
3
4
5
6
7
8
9
10public interface PropertyEditor {
// 设置值
void setValue(Object value);
// 获取值
Object getValue();
// 将值作为文本获取
String getAsText();
// 设置文本,并存成值
void setAsText(String text) throws java.lang.IllegalArgumentException;
}不知道上面在说什么?看看JDK提供的实现类PropertyEditorSupport。这里,有一个幕后对象value,可与
String互转。1
2
3
4
5
6
7
8
9
10
11
12
13
14
15
16
17
18
19
20
21
22
23
24
25
26
27public class PropertyEditorSupport implements PropertyEditor {
private Object value;
public void setValue(Object value) {
this.value = value;
}
public Object getValue() {
return value;
}
public String getAsText() {
return (this.value != null)
? this.value.toString()
: null;
}
public void setAsText(String text) throws java.lang.IllegalArgumentException {
if (value instanceof String) {
setValue(text);
return;
}
throw new java.lang.IllegalArgumentException(text);
}
}还是不知道?那我们看一下Spring的实现类
CurrencyEditor:它将Currency对象与String互转。1
2
3
4
5
6
7
8
9
10
11
12
13
14public class CurrencyEditor extends PropertyEditorSupport {
public void setAsText(String text) throws IllegalArgumentException {
setValue(Currency.getInstance(text));
}
public String getAsText() {
Currency value = (Currency) getValue();
return (value != null ? value.getCurrencyCode() : "");
}
}看到这里,想必已有所知晓,Spring的实现类是利用它来进行对象与String的相互转换。不信你看
org.springframework.beans.TypeConverterDelegate#doConvertTextValue方法1
2
3
4
5
6
7
8
9
10
11
12
13
14private Object doConvertTextValue(@Nullable Object oldValue, String newTextValue, PropertyEditor editor) {
try {
// 先尝试直接设置值
editor.setValue(oldValue);
} catch (Exception ex) {
if (logger.isDebugEnabled()) {
logger.debug("PropertyEditor [" + editor.getClass().getName() + "] does not support setValue call", ex);
}
}
// 再直接塞入字符串
editor.setAsText(newTextValue);
// 最后取出来的是个对象,转换逻辑在具体的实现类中
return editor.getValue();
}Spring自定义的
PropertyEditor非常多,多数在org.springframework.beans.propertyeditors包中,继承关系如下(这里仅选取几个典型的)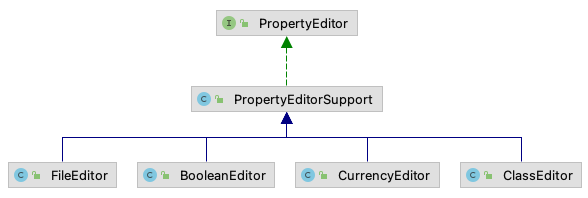
PropertyEditorRegistrar登记员,策略模式,将
PropertyEditor注册到指定的PropertyEditorRegistry。1
void registerCustomEditors(PropertyEditorRegistry registry);
它其实是一堆
PropertyEditor的持有器,它的唯一实现类ResourceEditorRegistrar,就是这样注册了一堆1
2
3
4
5
6
7
8
9
10
11
12
13
14
15
16
17
18
19
20
21public void registerCustomEditors(PropertyEditorRegistry registry) {
ResourceEditor baseEditor = new ResourceEditor(this.resourceLoader, this.propertyResolver);
doRegisterEditor(registry, Resource.class, baseEditor);
doRegisterEditor(registry, ContextResource.class, baseEditor);
doRegisterEditor(registry, InputStream.class, new InputStreamEditor(baseEditor));
doRegisterEditor(registry, InputSource.class, new InputSourceEditor(baseEditor));
doRegisterEditor(registry, File.class, new FileEditor(baseEditor));
doRegisterEditor(registry, Path.class, new PathEditor(baseEditor));
doRegisterEditor(registry, Reader.class, new ReaderEditor(baseEditor));
doRegisterEditor(registry, URL.class, new URLEditor(baseEditor));
ClassLoader classLoader = this.resourceLoader.getClassLoader();
doRegisterEditor(registry, URI.class, new URIEditor(classLoader));
doRegisterEditor(registry, Class.class, new ClassEditor(classLoader));
doRegisterEditor(registry, Class[].class, new ClassArrayEditor(classLoader));
if (this.resourceLoader instanceof ResourcePatternResolver) {
doRegisterEditor(registry, Resource[].class,
new ResourceArrayPropertyEditor((ResourcePatternResolver) this.resourceLoader, this.propertyResolver));
}
}PropertyEditorRegistry登记册,
PropertyEditor的集合,对它陌生,对它的实现类,你看DataBinder,你肯定熟悉。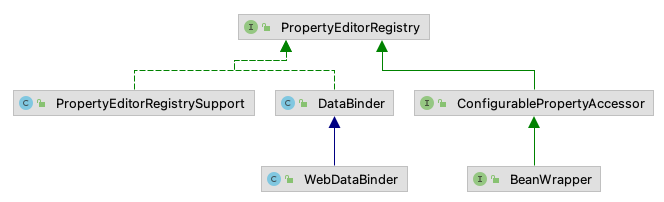
这里主要说明一下
PropertyEditorRegistrySupport,它是一个基本实现,默认已经注册了很多类型的PropertyEditor。1
2
3
4
5
6
7
8
9
10
11
12
13
14
15
16
17
18
19
20
21
22
23
24
25
26
27
28
29
30
31
32
33
34
35
36
37
38
39
40
41
42
43
44
45
46
47
48
49
50
51
52
53
54
55
56
57
58
59
60
61
62
63
64
65
66
67
68
69
70
71
72
73
74
75
76
77
78
79
80
81
82
83
84
85
86
87
88private void createDefaultEditors() {
this.defaultEditors = new HashMap<>(64);
// Simple editors, without parameterization capabilities.
// The JDK does not contain a default editor for any of these target types.
this.defaultEditors.put(Charset.class, new CharsetEditor());
this.defaultEditors.put(Class.class, new ClassEditor());
this.defaultEditors.put(Class[].class, new ClassArrayEditor());
this.defaultEditors.put(Currency.class, new CurrencyEditor());
this.defaultEditors.put(File.class, new FileEditor());
this.defaultEditors.put(InputStream.class, new InputStreamEditor());
if (!shouldIgnoreXml) {
this.defaultEditors.put(InputSource.class, new InputSourceEditor());
}
this.defaultEditors.put(Locale.class, new LocaleEditor());
this.defaultEditors.put(Path.class, new PathEditor());
this.defaultEditors.put(Pattern.class, new PatternEditor());
this.defaultEditors.put(Properties.class, new PropertiesEditor());
this.defaultEditors.put(Reader.class, new ReaderEditor());
this.defaultEditors.put(Resource[].class, new ResourceArrayPropertyEditor());
this.defaultEditors.put(TimeZone.class, new TimeZoneEditor());
this.defaultEditors.put(URI.class, new URIEditor());
this.defaultEditors.put(URL.class, new URLEditor());
this.defaultEditors.put(UUID.class, new UUIDEditor());
this.defaultEditors.put(ZoneId.class, new ZoneIdEditor());
// Default instances of collection editors.
// Can be overridden by registering custom instances of those as custom editors.
this.defaultEditors.put(Collection.class, new CustomCollectionEditor(Collection.class));
this.defaultEditors.put(Set.class, new CustomCollectionEditor(Set.class));
this.defaultEditors.put(SortedSet.class, new CustomCollectionEditor(SortedSet.class));
this.defaultEditors.put(List.class, new CustomCollectionEditor(List.class));
this.defaultEditors.put(SortedMap.class, new CustomMapEditor(SortedMap.class));
// Default editors for primitive arrays.
this.defaultEditors.put(byte[].class, new ByteArrayPropertyEditor());
this.defaultEditors.put(char[].class, new CharArrayPropertyEditor());
// The JDK does not contain a default editor for char!
this.defaultEditors.put(char.class, new CharacterEditor(false));
this.defaultEditors.put(Character.class, new CharacterEditor(true));
// Spring's CustomBooleanEditor accepts more flag values than the JDK's default editor.
this.defaultEditors.put(boolean.class, new CustomBooleanEditor(false));
this.defaultEditors.put(Boolean.class, new CustomBooleanEditor(true));
// The JDK does not contain default editors for number wrapper types!
// Override JDK primitive number editors with our own CustomNumberEditor.
this.defaultEditors.put(byte.class, new CustomNumberEditor(Byte.class, false));
this.defaultEditors.put(Byte.class, new CustomNumberEditor(Byte.class, true));
this.defaultEditors.put(short.class, new CustomNumberEditor(Short.class, false));
this.defaultEditors.put(Short.class, new CustomNumberEditor(Short.class, true));
this.defaultEditors.put(int.class, new CustomNumberEditor(Integer.class, false));
this.defaultEditors.put(Integer.class, new CustomNumberEditor(Integer.class, true));
this.defaultEditors.put(long.class, new CustomNumberEditor(Long.class, false));
this.defaultEditors.put(Long.class, new CustomNumberEditor(Long.class, true));
this.defaultEditors.put(float.class, new CustomNumberEditor(Float.class, false));
this.defaultEditors.put(Float.class, new CustomNumberEditor(Float.class, true));
this.defaultEditors.put(double.class, new CustomNumberEditor(Double.class, false));
this.defaultEditors.put(Double.class, new CustomNumberEditor(Double.class, true));
this.defaultEditors.put(BigDecimal.class, new CustomNumberEditor(BigDecimal.class, true));
this.defaultEditors.put(BigInteger.class, new CustomNumberEditor(BigInteger.class, true));
// Only register config value editors if explicitly requested.
if (this.configValueEditorsActive) {
StringArrayPropertyEditor sae = new StringArrayPropertyEditor();
this.defaultEditors.put(String[].class, sae);
this.defaultEditors.put(short[].class, sae);
this.defaultEditors.put(int[].class, sae);
this.defaultEditors.put(long[].class, sae);
}
}
小结:`PropertyEditor`,是Spring中类型转换的基础之一。
### ConversionService
上面我们看到的`PropertyEditor`,用来作为文本与对象之间的转换,而这里的`ConversionService`,则是用来作普通类型之间的转换。首先要补充两个概念
- `Converter`
转换器,只定义了一个convert抽象方法,如果我们要定义自己的类型转换器,直接实现它,然后通过注入获取到`ConversoinService`,注册给它就好。
```java
public interface Converter<S, T> {
T convert(S source);
}Spring中有大量的实现了它的转换器

ConverterFactory只定义了一个根据类型获取Converter的方法
1
2
3public interface ConverterFactory<S, R> {
<T extends R> Converter<S, T> getConverter(Class<T> targetType);
}ConversionService顾名思义,它是组织做类型转换的地方,内部包含一批
Converter实例,转换时从中找出类型对应的,执行转换即可。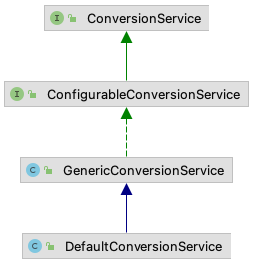
其主要接口实现在
GenericConversionService,默认实现是DefaultConversionService,这里注册了大量默认的Converter1
2
3
4
5
6
7
8
9
10
11
12
13
14
15
16
17
18
19
20
21
22
23
24
25
26
27
28
29
30
31
32
33
34
35
36
37
38
39
40
41
42
43
44
45
46
47
48
49
50
51
52
53
54
55
56
57
58
59
60
61
62
63
64
65
66
67
68
69
70
71
72
73
74
75public static void addDefaultConverters(ConverterRegistry converterRegistry) {
addScalarConverters(converterRegistry);
addCollectionConverters(converterRegistry);
converterRegistry.addConverter(new ByteBufferConverter((ConversionService) converterRegistry));
converterRegistry.addConverter(new StringToTimeZoneConverter());
converterRegistry.addConverter(new ZoneIdToTimeZoneConverter());
converterRegistry.addConverter(new ZonedDateTimeToCalendarConverter());
converterRegistry.addConverter(new ObjectToObjectConverter());
converterRegistry.addConverter(new IdToEntityConverter((ConversionService) converterRegistry));
converterRegistry.addConverter(new FallbackObjectToStringConverter());
converterRegistry.addConverter(new ObjectToOptionalConverter((ConversionService) converterRegistry));
}
public static void addCollectionConverters(ConverterRegistry converterRegistry) {
ConversionService conversionService = (ConversionService) converterRegistry;
converterRegistry.addConverter(new ArrayToCollectionConverter(conversionService));
converterRegistry.addConverter(new CollectionToArrayConverter(conversionService));
converterRegistry.addConverter(new ArrayToArrayConverter(conversionService));
converterRegistry.addConverter(new CollectionToCollectionConverter(conversionService));
converterRegistry.addConverter(new MapToMapConverter(conversionService));
converterRegistry.addConverter(new ArrayToStringConverter(conversionService));
converterRegistry.addConverter(new StringToArrayConverter(conversionService));
converterRegistry.addConverter(new ArrayToObjectConverter(conversionService));
converterRegistry.addConverter(new ObjectToArrayConverter(conversionService));
converterRegistry.addConverter(new CollectionToStringConverter(conversionService));
converterRegistry.addConverter(new StringToCollectionConverter(conversionService));
converterRegistry.addConverter(new CollectionToObjectConverter(conversionService));
converterRegistry.addConverter(new ObjectToCollectionConverter(conversionService));
converterRegistry.addConverter(new StreamConverter(conversionService));
}
private static void addScalarConverters(ConverterRegistry converterRegistry) {
converterRegistry.addConverterFactory(new NumberToNumberConverterFactory());
converterRegistry.addConverterFactory(new StringToNumberConverterFactory());
converterRegistry.addConverter(Number.class, String.class, new ObjectToStringConverter());
converterRegistry.addConverter(new StringToCharacterConverter());
converterRegistry.addConverter(Character.class, String.class, new ObjectToStringConverter());
converterRegistry.addConverter(new NumberToCharacterConverter());
converterRegistry.addConverterFactory(new CharacterToNumberFactory());
converterRegistry.addConverter(new StringToBooleanConverter());
converterRegistry.addConverter(Boolean.class, String.class, new ObjectToStringConverter());
converterRegistry.addConverterFactory(new StringToEnumConverterFactory());
converterRegistry.addConverter(new EnumToStringConverter((ConversionService) converterRegistry));
converterRegistry.addConverterFactory(new IntegerToEnumConverterFactory());
converterRegistry.addConverter(new EnumToIntegerConverter((ConversionService) converterRegistry));
converterRegistry.addConverter(new StringToLocaleConverter());
converterRegistry.addConverter(Locale.class, String.class, new ObjectToStringConverter());
converterRegistry.addConverter(new StringToCharsetConverter());
converterRegistry.addConverter(Charset.class, String.class, new ObjectToStringConverter());
converterRegistry.addConverter(new StringToCurrencyConverter());
converterRegistry.addConverter(Currency.class, String.class, new ObjectToStringConverter());
converterRegistry.addConverter(new StringToPropertiesConverter());
converterRegistry.addConverter(new PropertiesToStringConverter());
converterRegistry.addConverter(new StringToUUIDConverter());
converterRegistry.addConverter(UUID.class, String.class, new ObjectToStringConverter());
}
小结:ConversionService是Spring类型转换的基础之二
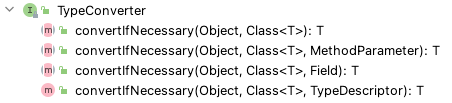
TypeConverter
类型转换器,只定义了三个用于类型转换的接口
刨除干扰项,它的主要实现类如下,有两个分支
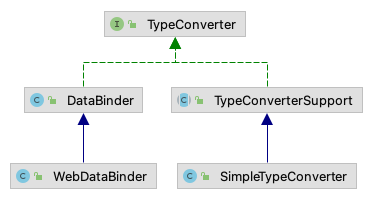
TypeConverterSupport这边:主要实现逻辑委托给了TypeConverterDelegate,它内部的实现逻辑是- 首先尝试使用
ConversionService进行转换 - 然后尝试用
PropertyEditor转换
- 首先尝试使用
DataBinder这边,则是使用了代理模式,将类型转换代理给内部维护的TypeConverter实例当然,
DataBind的逻辑还比较复杂,后面单独开一篇文章来说。
小结:TypeConverter应该是Spring中类型转换的门面担当。
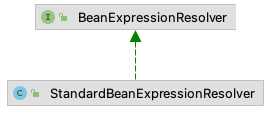
BeanExpressionResolver
Bean用到的表达式解析器,如下,其中,BeanExpressionContext仅包含Bean所在环境的容器和Scope。
1 | public interface BeanExpressionResolver { |
它只有一个实现类StandardBeanExpressionResolver
关键逻辑如下:解析出Expression,构建EvaluationContext,获取解析结果
1 | public Object evaluate(@Nullable String value, BeanExpressionContext evalContext) throws BeansException { |
于是这里引出了Spring的表达式相关抽象,关键有三个接口
Expression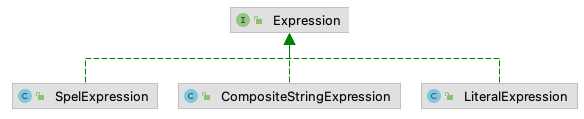
它就只有几类方法
getExpressionString():获取源表达式字符串getValue(xxx):在指定的EvaluationContext中,获取根据表达式计算出实际的对象getValueType(xxx):在指定的EvaluationContext中,获取得到的值的类型getValueTypeDescriptor(xxx):在指定的EvaluationContext中,获取得到的值的类型描述对象setValue(xxx):为当前表达式设置一个值isWritable():当前表达式是否可写,即是否可以调用setValue(xxx)
其默认实现就三种
SpelExpression:SPEL表达式,这个不用多说LiteralExpression:常量表达式,表达式本身就是值,不会经过任何转换CompositeStringExpression:内部维护多个Expression实例,但解析结果是这些表达式解析结果的字符串相加
ExpressionParser表达式解析器,即将字符串解析为
Expression对象。1
2
3
4public interface ExpressionParser {
Expression parseExpression(String expressionString) throws ParseException;
Expression parseExpression(String expressionString, ParserContext context) throws ParseException;
}其主要解析逻辑在
TemplateAwareExpressionParser,决定了一个字符串是被解析成SPEL表达式还是别的什么。其具体过程,不是本文深究的内容。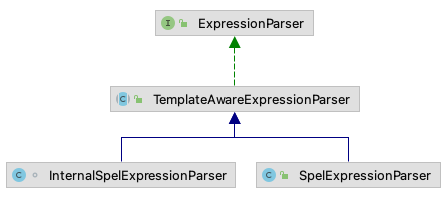
EvaluationContext表达式计算上下文,主要是持有类型转换、Bean解析器、属性访问器等工具,一个典型的实现是
StandardEvaluationContext。
小结:Spring中的表达式实现,多半还是SPEL表达式的解析结果。
xxxPostProcessor
BeanPostProcessor1
2
3
4
5
6
7
8public interface BeanPostProcessor {
default Object postProcessBeforeInitialization(Object bean, String beanName) throws BeansException {
return bean;
}
default Object postProcessAfterInitialization(Object bean, String beanName) throws BeansException {
return bean;
}
}在Bean初始化前和初始化后执行一些操作。
问题:Spring会有多少个
PostProcessor,我们自定义的如何加入呢?答:容器启动时,会从容器中寻找所有
BeanPostProcessor,然后注册,所以不大好说有多少个;我们自定义的,实现BeanPostProcessor接口就好。BeanFactoryPostProcessor针对
BeanFactory执行一些操作。1
2
3public interface BeanFactoryPostProcessor {
void postProcessBeanFactory(ConfigurableListableBeanFactory beanFactory) throws BeansException;
}
ApplicationStartup
这是一个没有太多”实质用处”的抽象,并不是说它真的没用,它只是一个用来做启动标识的抽象。
启动流程
前面将几乎所有组件都介绍了一遍,为的就是在分析启动流程时候能够更加顺利。再次回顾前面的启动代码,我们只是实例化了上下文,然后就能使用了
1 | fun main() { |
看构造方法
1 | public AnnotationConfigApplicationContext(String... basePackages) { |
总结下来就是
- 创建
AnnotatedBeanDefinitionReader、ClassPathBeanDefinitionScanner - 调用
ClassPathBeanDefinitionScanner的scan方法完成扫描 - 调用
AbstractApplicationContext的refresh()方法完成容器刷新
结合前文ApplicationContext继承拓扑图,可进一步看到,Spring将容器的Bean定义的加载工作放到具体实现来做,加载完成后,再调用基层的refresh()做容器刷新,应用加载到的Bean定义,分层非常明显。
扫描的逻辑,其实有点复杂,我们以后再分析,这里重点关注refresh()干了什么。原本的注解说明了一切
1 |
|
逐项分析重要步骤
准备刷新
1 | protected void prepareRefresh() { |
要点:初始化属性源,前面分析过Environment,包含很多属性源,除了默认的系统属性和系统环境变量,子ApplicationContext还会初始化自己的属性源,比如后面将要分析的GenericWebApplicationContext,就进行了实现:它添加了servletContextInitParams和servletConfigInitParams两个属性源。
1 | // GenericWebApplicationContext中 |
准备BeanFactory
1 | protected void prepareBeanFactory(ConfigurableListableBeanFactory beanFactory) { |
要点1:
ApplicationContextAware、ApplicationListener的注册、LoadTimeWeaverAware,都是通过后置处理器完成的要点2:注册了几个环境变量相关的单例,方便应用中直接使用
environmentsystemPropertiessystemEnvironmentapplicationStartup
要点3:暂时未发现
BeanPostProcessor在何时何地被调动,猜测是Bean创建时,待查。
应用BeanFactoryPostProcessor
1 | protected void invokeBeanFactoryPostProcessors(ConfigurableListableBeanFactory beanFactory) { |
要点,调用getBeanFactoryPostProcessors()获取后置处理器,而正常流程里是没有这个选项的,因此它只可能来自子类,在上下文启动的生命周期方法中添加,比如postProcessBeanFactory()
注册BeanPostProcessor
1 | protected void registerBeanPostProcessors(ConfigurableListableBeanFactory beanFactory) { |
- 要点1:优先处理实现了
PriorityOrdered的处理器,其次是Ordered,其实吃没有实现排序接口的 - 要点2:实现了
MergedBeanDefinitionPostProcessor的处理器将被重新注册,即位置移到最后面 - 要点3:
ApplicationListenerDetector将被重新注册
初始化MessageSource
1 | protected void initMessageSource() { |
- 要点1:我们可以自定义
MessageSource注入到容器 - 要点2:如果不注入一个
MessageSource,getMessage()将不会返回内容
好奇:前面我们分析了MessageSource,明明使用的ResourceBundleMessageSource,这里却不是这样的?
初始化事件广播器
1 | protected void initApplicationEventMulticaster() { |
要点1:SimpleApplicationEventMulticaster是没有线程池的,事件是同步调用的。
注册事件监听器
1 | protected void registerListeners() { |
要点1:监听器来自两方面,一个是初始化过程中添加的,二是容器中注入的Bean
BeanFactory初始化的收尾工作
1 | protected void finishBeanFactoryInitialization(ConfigurableListableBeanFactory beanFactory) { |
- 要点1:取出
ConversionService - 要点2:
EmbeddedValueResolver,暂时看不懂 - 要点3:
LoadTimeWeaverAware,也暂时看不懂 - 要点4:初始化所有非延迟加载的单例Bean
整个刷新的收尾工作
1 | protected void finishRefresh() { |
要点:LifecycleProcessor是在这里创建的
小结
总结一下,ApplicationContext初始化时,大致做了下面这些事,也就是说,前面”关键组件“中提到的内容,这里都进行了初始化。
初始化了
Environment的属性源注册了表达式解析器,用于解析Bean中出现的表达式,SPEL表达式也包含在其中。
注册了Bean后置处理器,分优先级,优先
ProirityOrdered,其次Ordered,最后是其它。初始化了
MessageSource创建了事件广播器,事件监听器,并将二者进行结合
注册了生命周期处理器,用于处理
Lifecycle相关内容注册了
ConversionService、PropertyEditor,用于类型转换
总结
这篇文章虽然很长,但内容覆盖其实没多少:解读了一下主要组件,看了看容器启动时的行为。就这,还留了Bean抽象和管理的尾巴留待今后探索。但它花了我很长时间,准备用了一周的工作日业余时间,写用了一整天。各种小组件,真的很多,而且都是自己抽象的。不过说到底,还是我太菜🤔。
一些类的命名方式
- xxxxSupport:一般是针对xxxx接口的基本实现类,如PropertyEditorRegistrySupport
- xxxxDelegate:针对xxxx功能的帮助类,如TypeConverterDelegate
- Abstractxxxx:模板方法的体现,实现了xxxx的大部分功能,只有小部分让子类实现
- xxxxRegistry:注册器,持有xxxx的一个集合器,支持向其中注册添加
- xxxxResolver:解析器,一般用来解析特性的xxxx对象或字符串